Newsletters: Amazon SES and SNS
![]()
This guide will help you to setup Amazon SES and SNS for the WordPress Newsletter plugin.
Video of Amazon SES and SNS Setup
Amazon SES
1. What is Amazon SES?
Amazon SES (Simple Email Service) is an SMTP email relay service provided by Amazon which you can use to send out bulk emails through your WordPress Newsletter plugin.
The advantage is that you get emails reliably and efficiently delivered to your subscribers at a very affordable cost and without the risk of overloading or blacklisting your own server.
2. Setting up Amazon SES in the Newsletter plugin
First, log in to your Amazon AWS console and then go to SES. Pleas ensure that you have applied for SES and that you have then requested live/production access else it is not ready to use yet.
2.1. Add Verified Senders
Inside SES, go to “Verified Senders” and click “Verify a New Email Address” button at the top to start the verification process.
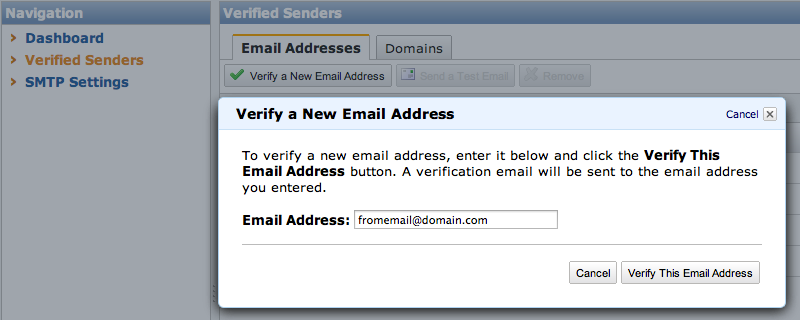
You have to verify 2 email addresses, this is very important, else it won’t send and you’ll get a “SMTP Error: Data not accepted.” error since both are not verified.
The first email address to verify is the “From Address” email address under Newsletters > Configuration > General > General Mail Settings. This is the address that you’re sending emails from. The “From” header set on all outgoing emails.
The second email address to verify is the “Bounce Receival Email” under Newsletters > Configuration > General > Bounce Configuration. This is the “Return-Path” header set on all emails.
If the “Bounce Receival Email” setting’s email address is the same as the “From Address” setting’s email, then obviously you’ll just verify the one email address.
Finish the verification process as instructed by Amazon SES to continue.
2.2. Get the SMTP Settings
Go to “SMTP Settings” in SES on the left-hand side where you’ll see the server name (host name), port, protocol and authentication settings. Please copy these or make a note of them as you’ll use them in the Newsletter plugin later on.
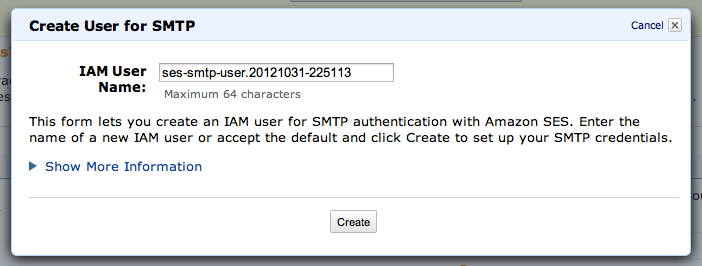
Click the “Create My SMTP Credentials” button to create an SMTP username and password that you’ll be using later on in the Newsletter plugin as well. A dialog will open and you can click “Create” to create your SMTP username/password for Amazon SES. Copy these details or download the credentials so you don’t lose them.
2.3. Fill in the Newsletter plugin Settings
With the Amazon SES host name, port, protocol, username and password values you are ready to fill these settings into the Newsletter plugin to test the email settings and hopefully start sending bulk emails immediately.
Go to Newsletters > Configuration > General > General Mail Settings and choose “SMTP Server” for the “Mail Type” setting to see the SMTP settings appear. You’ll now fill in the host name, port, protocol, username and password accordingly. You can copy/paste the values.
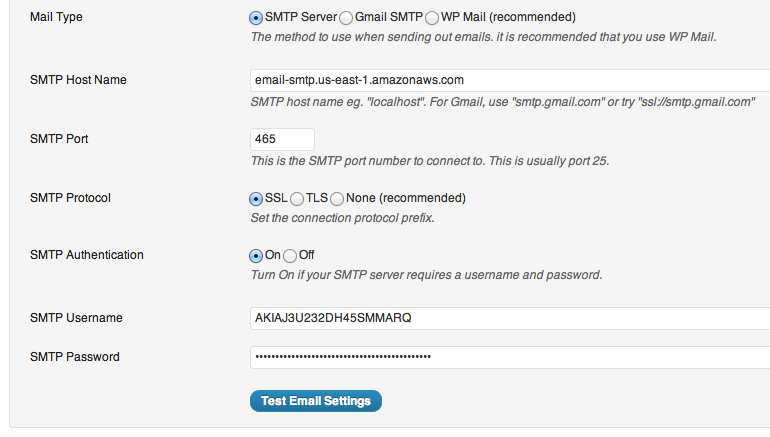
With that done, click the “Test Email Settings” button to send a test to your own email address. The plugin will show it is successful and you will receive a test email within a few moments.
If there is an error, the error message should be descriptive. Usually “SMTP Error: Data not accepted” means that either the “From Address” and/or the “Bounce Receival Email” email address hasn’t been verified in the Amazon SES account or that the Amazon SES account is not yet in production mode.
Amazon SNS
1. What is Amazon SNS?
Amazon SNS is a notification service and it stands for Simple Notification Service.
This service can be used for several purposes but in the case of the WordPress Newsletter plugin it is used to handle bounces. Amazon SNS will send a push notification back to your WordPress site where the Newsletter plugin is installed when a soft or hard bounce occurs on an email which you sent using Amazon SES.
The purpose of using Amazon SNS with the WordPress Newsletter plugin is to handle bounced emails correctly in order to keep your subscribers database and mailing lists clean from unwanted emails wasting bandwidth, space and email cost.
2. Setting up Amazon SNS with the Newsletter plugin
Even though it may seem like a daunting and technical task, it is rather straightforward. I’ll walk you through the quick steps to setup Amazon SNS for bounce handling.
Before you get started on this setup of Amazon SNS, please ensure that you have completed the setup of Amazon SES for the actual sending of emails. Amazon SNS only works in the WordPress Newsletter plugin if you are using Amazon SES for the sending of the emails.
2.1. Enable Amazon SNS in the Newsletter plugin

Go to Newsletters > Configuration > General > General Mail Settings in your WordPress Newsletter plugin installation in your WordPress dashboard.
1. Mail Type
Select API for Mail Type.
2. Service
Select Amazon SES as service.
3. Amazon Key
Fill in your AWS access key, which can be obtained under AWS Console>IAM.
4. Amazon Secret
Fill in your AWS secret key, which can be obtained under AWS Console> IAM.
5. Amazon Region
Select AWS region of your account from a drop down list.
6. Actions
- Verify email address – Click this button to verify your email address (which you put in “From” field”)
- Get Verified Emails – Get the list of all your verified emails.
- Get Send Quota – An example o send quota: Max 24 Hour Send: 50000.0, Max Send Rate: 14.0, Sent in Last 24 Hours: 157.0
7. Amazon SES +SNS
When you send emails with Amazon SES, you can record certain events like bounces and complaints.
2.2. Create an Amazon SNS Topic
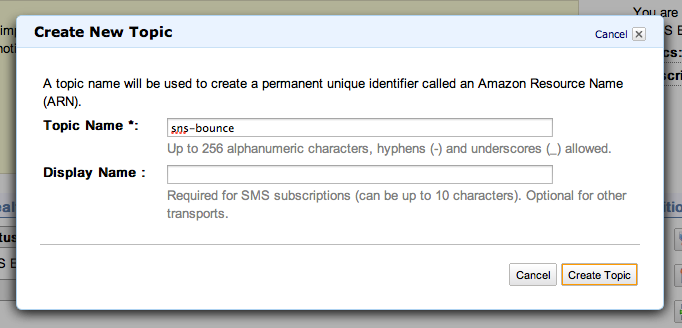
Go to your Amazon SNS Console and once you are in, click the “Create New Topic” button in the dashboard to create a topic specifically for this purpose. Fill in “sns-bounce” as the “Topic Name” value and then click the “Create Topic” button.
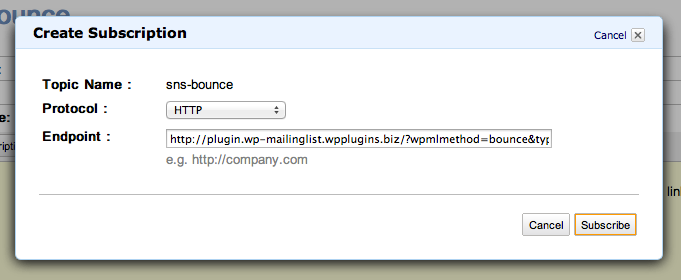
2.2. Create an Amazon SNS Subscription
The topic “sns-bounce” will be created and you’ll now enter the view of the topic in the Amazon SNS dashboard.
Now click the “Create Subscription” button to create a subscription on this topic.
Choose “HTTP” (change from “HTTPS” to “HTTP“) as the protocol since your server may not support the SSL protocol. If you are sure what SSL is and you are sure that you have SSL protocol enabled on your server and it works, then you may leave it on “HTTPS“.
The “Endpoint” is a URL which needs to be filled in. This URL is provided to you in the Newsletter plugin under Newsletters > Configuration > General > Bounce Configuration. This is the URL which you copied to your clipboard in 2.1. of this Amazon SNS documentation. Now paste it here into this “Endpoint” field.
Now click the “Subscribe” button and you’re done with this step.
2.3. Link Amazon SNS and SES
Like the documentation mentions earlier on, you need to use Amazon SES for the sending of emails in order to use Amazon SNS for the bounce handling. We’ll now link the two services together so that SNS will be used for the bounce notifications when sending with SES.
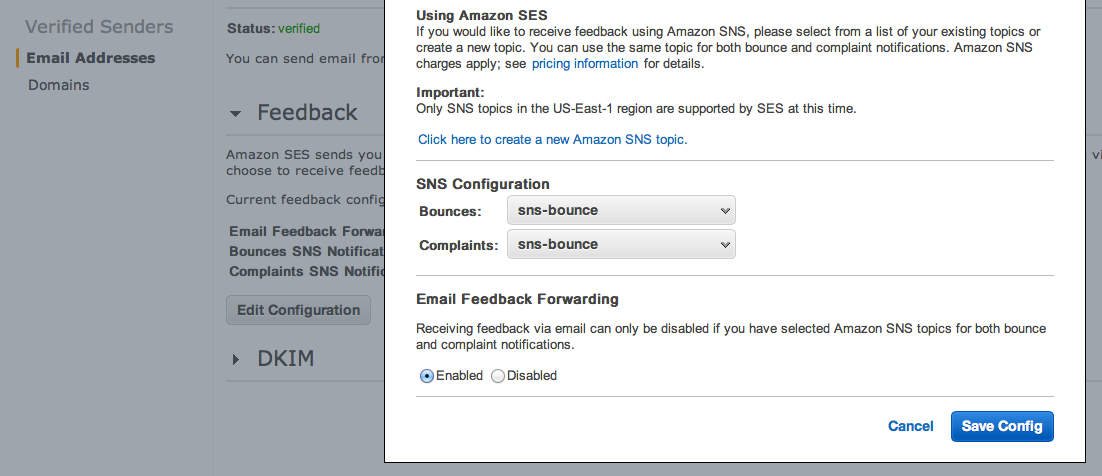
Go to your Amazon SES console. Under “Verified Senders” on the left, click on “Email Addresses” . Now click the view icon/button next to the email address that you are using to send emails From through Amazon SES. It will show you all it’s settings.
Expand the “Feedback” heading and click the “Edit Configuration” button. Now select the “sns-bounce” topic (which you created earlier in SNS) for both bounces and complaints. Once you’ve done that, click the blue “Save Config” button in the dialog.
Earn Money by Referring People
Refer customers to us with your affiliate link and earn commission on sales from your link.

